Importing animation data from Maya into Unity with zero footsliding
^^ Gross foot sliding
Bit of a niche one but I hate the process of re-figuring out how to do something that I’ve previously done, so I’m trying to document my processes more. Purely for selfish reasons, but perhaps others can benefit.
Also because it took me an annoying 20 minutes to figure out how to prevent foot sliding and I never want to have to figure that again. This video was really helpful!
I’m using the Oliver rig from Kiel Figgins. I’m also using Maya 2023.3.1, and Unity 6 (6000.0.38f1).
1. Importing the Oliver Rig and Model from Maya into Unity#
IMPORTANT: If you’re referencing your rig in Maya when animating (as you should be doing) make sure to export the model when it has already been referenced into the Maya project, not from the source file. This makes sure the namespaces match and the animation can find the model.
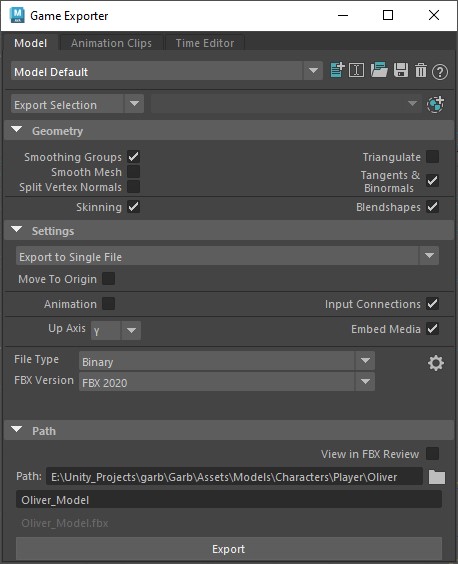
- Open Maya’s built in Game Exporter, set to Model tab
- Export selection -> select hierarchy of both Unity_Output_Meshes and Unity_Output_Skeleton
- Under Geometry -> Smoothing Groups, Tangents & Binormals, Skinning and Blendshapes should be on, and everything else off
- Make sure Animation is off
- FBX version set to 2020, file type set to Binary
- Up Axis = Y
- Export to Single File
- Choose path and export
In Unity:
- Bring in all the textures into the correct place in the file structure. If they’re in subfolders, drag them out to all be in one folder. IMPORTANT: Doing this step before importing the model (in the order written here) allows for the model to hook up automatically to the textures.
- Bring in the fbx you’ve just imported from Maya. There may be an error asking you to declare certain texture maps as normal maps - hit accept
- In my case all the materials hooked up to their respective textures correctly and automatically

2. Importing animation using the Oliver Rig from Maya into Unity#
- Open Maya’s built in Game Exporter, set to the animation clips tab
- Export selection -> select hierarchy of Unity_Output_Skeleton
- Creat a new animation clip and set the name and corresponding start and end
- FBX version set to 2020, file type set to Binary
- Up Axis = Y
- Save Multiple Clip Files
- Choose path and export. Can leave file prefix blank
In Unity:
- Bring the fbx file into Unity, in the correct place in the file structure.
- Unfold it with the arrow to find the specific animation clip you animated (you’ll need this in a bit)
- Create a new animation controller and name it accordingly
- Drag in the animation clip into this animation controller, make sure it’s hooked up to Entry
- IMPORTANT: Click the clip and enable Foot IK (if you’re using Foot IK in the animation. need to test this further, if not using IK should we still enable this?)
- IMPORTANT: select the whole file you dragged in (before unfolding with the arrow) and under Anim. Compression, change this to ‘Off’. These last two steps should prevent foot sliding and be much more accurate to what you’ve animated within Maya
- Enable ‘Loop Time’, if your animation should loop.
- Place your model into the scene and create an Animator component on it
- Drag in the new controller you’ve created into ‘Controller’
Fingers crossed, you should now see your character peform the exact animation you authored in Maya with no foot sliding.
Changelog:
- 2025.06.12 - v1.1: Emphasised the need to match namespaces when exporting after wasting 1.5 hours trying to figure out the above wasn’t working anymore.
- 2025-04-15 - v1.0: Initial Version